OS는 우분투 최신 안정화 버전 설치
Python은 최신버전 anaconda 배포판 설치
추가로 필요한 python 라이브러리는 tensorflow, keras, pyodbc, openpyxl 등
Python IDE는 pycharm, spyder
Spyder는 anaconda설치 시 같이 설치되므로 추가로 pycharm만 설치
apt-get install spyder
sudo add-apt-repository ppa:mystic-mirage/pycharm
sudo apt-get update
To install the community edition of PyCharm, use the command below. It will download data of around 120 MB.
sudo apt-get install pycharm-community
[ubuntu pycharm install] https://itsfoss.com/install-pycharm-ubuntu/
오피스는 리브레오피스가 디폴트로 우분투 설치 할 때 같이 설치됨.
그 외 서버에 붙을 클라이언트 프로그램은 어떤게 있는지 확인 필요.
머신러닝 서버 설치 S/W
1. OS
- 우분투 16.04
2. JDK -- maven, gradle 때문에 필요.
- 1.8
sudo add-apt-repository ppa:webupd8team/java
sudo apt update; sudo apt install oracle-java8-installer

javac -version

sudo apt install oracle-java8-set-default
3. Python
- 3.5 이상
4. Python library
- Pandas : 행렬 및 자료구조 – BSD
pip install pandas
- Numpy : 수치 배열 연산 – BSD
pip install numpy
- Xgboost : Gradient Boosting algorithm – Apache 2.0
$ pip install xgboost
- Sqlalchemy : ORM Mapping – MIT
$ pip install sqlalchemy
- Scikit-learn : data mining, analysis – BSD
$ pip install -U scikit-learn
- Requests : HTTP Support – Apache 2.0
$ pip3.4 install requests
- PyMySQL : Maria DB Connection – MIT
$ sudo pip3 install PyMySQL
- JayDeBeApi : JDBC Connection – LGPL
$ pip install JayDeBeApi
5. App
- Mariadb 10.2 이상
apt-get install software-properties-common
# apt-key adv –recv-keys –keyserver hkp://keyserver.ubuntu.com:80 0xF1656F24C74CD1D8
# apt-key adv –recv-keys –keyserver keyserver.ubuntu.com F1656F24C74CD1D8
# add-apt-repository ‘deb [arch=amd64,i386,ppc64el] http://ftp.kaist.ac.kr/mariadb/repo/10.2/ubuntu xenial main’
(apt 에 수동으로 reposiory 변경할 시 vi /etc/apt/source.list )
# deb http://archive.canonical.com/ubuntu xenial partner
deb [arch=amd64,ppc64el,i386] http://ftp.kaist.ac.kr/mariadb/repo/10.2/ubuntu xenial main
deb-src http://ftp.kaist.ac.kr/mariadb/repo/10.2/ubuntu xenial main
source 를 수정한 뒤에 변경한 repository 로 최신 패키지를 설치할 수 있도록 apt-get update를 진행합니다.
5) mariadb를 설치합니다.
apt-get install mariadb-server
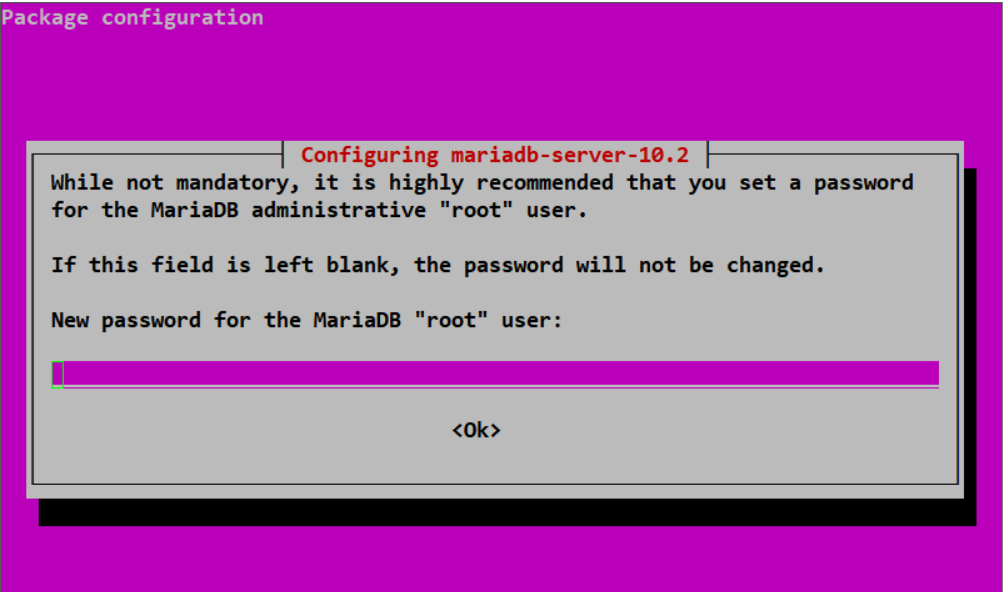
mariadb 접속시 필요한 패스워드를 입력합니다.
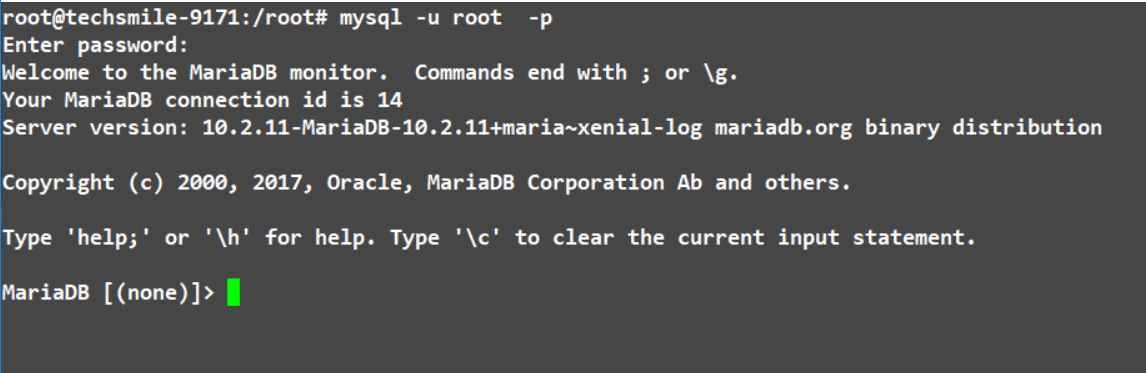
6) mariadb 접속에 성공하면 mariadb 설치가 완료되었습니다.
# mysql -u root -p
[원본참조] http://idchowto.com/?p=40343
- Maven(latest)
Step 3: Install Apache Maven
You can download the latest stable version of Apache Maven from its official website, otherwise you can download it directly with the following command:
cd /opt/
wget http://www-eu.apache.org/dist/maven/maven-3/3.3.9/binaries/apache-maven-3.3.9-bin.tar.gz
Once the download has completed, extract the downloaded archive.
sudo tar -xvzf apache-maven-3.3.9-bin.tar.gz
Next, rename the extracted directory.
sudo mv apache-maven-3.3.9 maven
Step 4: Setup environment variables
Next, you will need to setup the environment variables such as M2_HOME, M2, MAVEN_OPTS, and PATH. You can do this by creating a mavenenv.sh file inside of the /etc/profile.d/ directory.
sudo nano /etc/profile.d/mavenenv.sh
Add the following lines:
export M2_HOME=/opt/maven
export PATH=${M2_HOME}/bin:${PATH}
Save and close the file, update its permissions, then load the environment variables with the following command:
sudo chmod +x /etc/profile.d/mavenenv.sh
sudo source /etc/profile.d/mavenenv.sh
Step 5: Verify installation
Once everything has been successfully configured, check the version of the Apache Maven.
mvn --version
You should see the following output:
Apache Maven 3.3.9 (bb52d8502b132ec0a5a3f4c09453c07478323dc5; 2015-11-10T22:11:47+05:30)
Maven home: /opt/maven
Java version: 1.8.0_101, vendor: Oracle Corporation
Java home: /usr/lib/jvm/java-8-oracle/jre
Default locale: en_US, platform encoding: ANSI_X3.4-1968
OS name: "linux", version: "3.13.0-32-generic", arch: "amd64", family: "unix"
[원본참조] https://www.vultr.com/docs/how-to-install-apache-maven-on-ubuntu-16-04
- Gradle(latest)
1. Install Gradle on Ubuntu 16.04 Manually
1.1. Prerequisites
Gradle requires Java 7 or new version. You can check by issue command:
java -version
1.2. Download Gradle
You can download Gradle distribution from the Gradle website. Currently, the latest release of Gradle is version 3.0.
In the following command, I will download the binary only version of Gradle:
wget https://services.gradle.org/distributions/gradle-3.0-bin.zip
1.3. Unpack Gradle
sudo unzip gradle-3.0-bin.zip -d /usr/local
This command will unpack the Gradle distribution to /usr/local/gradle-3.0. Note that we need unzip package to run the command. If there is no unzip on your machine, you can install it by typing:
sudo apt install unzip
Next, we will create a shortcut to that Gradle distribution:
cd /usr/local
sudo ln -s gradle-3.0 gradle
1.4. Create GRADLE_HOME Environment Variables.
Create a gradle.sh file at /etc/profile.d folder (you can use vi with below command)
sudo vi /etc/profile.d/gradle.sh
Enter the follow content to the file:
export GRADLE_HOME=/usr/local/gradle
export PATH=${GRADLE_HOME}/bin:${PATH}
Save the file.
We will need to activate the above environment variables. We can do that by log out and log in again or simply run below command:
source /etc/profile
1.5. Verify
To check if Gradle is properly installed, we just need type:
gradle -v
6. 기타
- Keras는 2.0 버전 이상
- Keras 1.0 버전도 필요하므로, 가상화 환경이 필요(Docker 또는 python 가상화)
- 서버에 GUI로 붙을 수 있는 클라이언트 프로그램 추천(VNC 또는 xmanager 같은)
- 교육프로그램 아젠다 추천 및 전달(교육은 설치 마무리 되는 1월 중순 정도)
$ sudo apt-get install python3-pip python3-dev
# Python2의 경우
$ pip install virtualenv
# Python3의 경우
$ pip3 install virtualenv
$ virtualenv --python=파이썬버전 가상환경이름
# ex)
# $ virtualenv --python=python3.5 py3_env
# $ virtualenv --python=python2.7 test_env2
$ source 가상환경이름/bin/activate

[원본] https://beomi.github.io/2016/12/28/HowToSetup-Virtualenv-VirtualenvWrapper/
keras 설치 정보 :
https://www.versioneye.com/python/keras/1.0.5
pip install https://github.com/fchollet/keras/tarball/1.0.5
https://www.versioneye.com/python/keras/2.1.2
pip install https://github.com/fchollet/keras/tarball/2.1.2